The essential HTML elements for beginners
Summary: While there are a lot of HTML elements, some are more essential than others, esspecially early on in your web development journey, and we take a look at what those ones are in this article.

When you first start learning HTML, it can seem very straightforward with paragraph elements, and then headings, but very quickly that list expands to have links, images, lists and list items, strong and em tags, and the list just seems to keep growing and growing!
And that list can seem overwhelming as there are 118 different elements in its current living standard!
Don’t let that get you down, though, as you don’t need to learn them all right out of the gate.
Early on there are about 20 to 25 tags that you need to get a firm grasp of.
To make things even simpler, we’ll be grouping these essential HTML tags into three categories:
- Metadata Tags
- Layout Tags
- Content-Related Tags
These three categories are not official by any means, they are just a way I like to think about them, in order to help simplify things a little bit.
Alsp, before we delve into these categories, I want to clarify that this post is intended for beginners who are just starting to write HTML and CSS. If you’re just looking into web development but haven’t started writing any code yet then you can check out my tutorial series designed specifically for absolute beginners.
The Metadata Tags
The first section of an HTML document is all the hidden information, but necessary information about the page that is not visible to the end-users.
This is a bit like a photograph taken with your phone or a DSLR. If you look at the image, you just see a picture, but in that same file there is more information, like the location it was taken at, the fstop, iso, etc.
<!DOCTYPE>
This tag, placed as the first thing in your HTML document, helps the browser identify the type of document it’s parsing. Its main role is to declare the document type and version of HTML.
Older versions of html had a bit more to remember here, but now all we need to do is this:
<!DOCTYPE html><html>
Right after the doctype, we have the <html> tag. This marks the beginning and the end of an HTML document.
It might feel a little redundant, since we just told the browser we’re in an html document with the doctype, but we still need to include this.
<!DOCTYPE html>
<html>
  <!-- html goes here -->
</html>
The <head> of the document
The <head> tag is the container for all the other metadata elements, which include meta tags, link, style, script, and title.
<!DOCTYPE html>
<html>
  <head></head>
</html>
The <title> of the document
The <title> tag is meant for the title of the webpage, which appears in your web browser’s tab bar. It’s also displayed in search engine results, and can help a little with Search Engine Optimization.
<!DOCTYPE html>
<html>
  <head>
    <title>The title of the page</title>
  </head>
</html>
Adding CSS to our page
We can add CSS as inline declarations on each element, but in general, you’ll usually want to add it within a <style> element, or use the <link> to link to an external CSS file.
<!DOCTYPE html>
<html>
  <head>
    <title>The title of the page</title>
    <style>
      /* CSS goes here */
    </style>

    <!-- or link to an external CSS file -->
    <link href="style.css" rel="stylesheet" />
  </head>
</html>
The <body>
After defining the meta tags, we move to the <body> of the document where the primary webpage content lives.
Here’s where we’ll now discuss the content and layout-related tags.
<!DOCTYPE html>
<html>
  <head>
    <title>The title of the page</title>
    <!-- or link to an external CSS file -->
    <link href="style.css" rel="stylesheet" />
  </head>

  <body>
    <!-- content for the site goes here -->
  </body>
</html>
Content-Related Tags
These tags help shape your site’s content, dictating whether it should be treated as a paragraph, a heading, a list, a link, an image, and so on.
Paragraph <p> & Headings <h1> through <h6>
These tags tell the browser to treat the enclosed text as a paragraph or as a heading.
<h1>This is a main heading</h1>
<p>This is a paragraph.</p>
<h2>This is a secondary heading)</h2>
You can only have one <h1> per page, and you can treat this as the title of the page. The headings that follow help create the document structure, similar to how a textbook has chapters (the <h2>s), then sub-sections within each chapter (<h3>) and so forth.
Ordered and Unordered Lists, and List Items <ol> <ul> <li>
These tags allow you to have lists on your site.
As the names suggest, ol generates an ordered list, meaning it will be a numbered list by default, while ul is an unordered list, creating bullet point for each list item.
Each point is enclosed within a List Item (li) tag.
<ol>
  <li>Item 1</li>
  <li>Item 2</li>
  <li>Item 3</li>
</ol><ul>
<li>Item 1</li>
<li>Item 2</li>
<li>Item 3</li>
</ul>Emphasis <em> and Strong <strong>
These tags allow you to highlight specific parts of your text.
The em tag puts an emphasis on the text, with the default styling italicizing the text, while the strong tag signifies extra importance, with the default styling making the text bold.
Both of these have semantic meaning, which means that the purpose isn’t to change the style of the text, but to actually emphasize the word, or add importance to it.
<p>This is <em>really</em> awesome!</p>
<p>You <strong>must</strong> follow these instructions.</p>
Anchor tags <a>
The anchor tag creates hyperlinks that direct the users to other pages or sections of the same page.
External links must start with http:// or https://.
Links to other pages within your site can point to a relative URL, such as <a href="blog/post-1.html">, and to link to the same location within a page, you can point to the ID of the element you want to jump to, as you can see in the example below.
<a href="https://www.example.com">This is a link to an external page</a>
<a href="#about-me">This is a link to about me section of the same page</a>

<!-- other content -->

<section id="#about-me"></section>
Images <img>
The image tag, as the name suggests, allows you to insert images into your webpage.
For images, we need to tell the browser where to find the image with the src attribute, and describe the image with alt text, which is used both with screen readers, as well as if the image fails to load, users will at least have a description of what it is.
Images are one of the few self-closing elements, which means that we don’t need a closing tag. This is because the content is within the attributes.
<img
  src="sunset.jpg"
  alt="A beautiful sunset, with an orange sky and purple clouds reflecting off the still water"
/>
<span>
The span element is used to style a specific part of the text within a paragraph or a heading.
It is similar to the <strong> and <em> elements, but it has no semantic meaning or default styles.
<p>This is an <span style="color: red;">important</span> announcement.</p>Layout Tags
Layout tags help us organize blocks of content.
They provide a means to dictate how your content should be grouped and its presentation. The main ones are:
<main>
The <main> element is used to highlight, well, the main content of the page.
You can only have one <main> per page.
<main><!-- Unique content for each page goes here --></main><header>
This is the header of the page, and is often used for the logo and navigation links.
This isn’t part of the <main>.
For example, if you had a Pricing page, the logo and navigation are related to your entire website but aren’t specific to the pricing. So they go in the <header>, and then the pricing specific content goes in the <main>.
<header><!-- Logo and navigation links go here --></header>
<main><!-- Unique content for each page goes here --></main>
You can have <header>s inside other elements too, such as sections and articles, as the header of that section of content. For your early days, I wouldn’t worry about that too much, though.
Navigation (nav):
This is typically located inside the header and footer, and it organizes the navigation links for the website.
<nav><!-- Navigation links go here --></nav>Footer (footer):
The <footer> is similar to the <header>, in that it’s generally information that’s site-wide, rather than specific to that individual page.
For example, you often find copyright information, contact details, and secondary navigation links in the <footer>.
<header><!-- Logo and navigation links go here --></header>
<main><!-- Unique content for each page goes here --></main>
<footer><!-- Footer content goes here --></footer>
Like with <header>, you can have <footer>s inside other elements too, such as sections and articles, as the footer of that section of content. Once again, for the time being I wouldn’t worry about that too much.
<article>
This is used to denote a piece of content that can stand on its own within your site.
For example, you might have a recipe on your website. You could take that recipe from your site and place it somewhere else, and someone will still be able to make sense of it. That means i can stand on it’s own, so it is an <article>.
<article><!-- Article content --></article><section>
While an <article> can stand on its own, a <section> breaks up parts of a larger piece of content.
We can use <section> inside of a <main> that has different parts to it, or even within an <article>, where you might have several different sections of content.
<main>
  <h1>All about me</h1>
  <section>
    <h2>My hobbies</h2>
    <!-- more content -->
  </section>
  <section>
    <h2>My family</h2>
    <!-- more content -->
  </section>
</main>
Divisions <div>
All of the layout elements above have semantic meaning. A <div>, however, has no semantic meaning, and instead we use it to group content so we can create a layout with CSS.
This is the most common element you’ll see used in HTML documents most of the time.
The screenshot below is from Smashing Magazine, where we can see <div>s are used for a lot of different groupings.
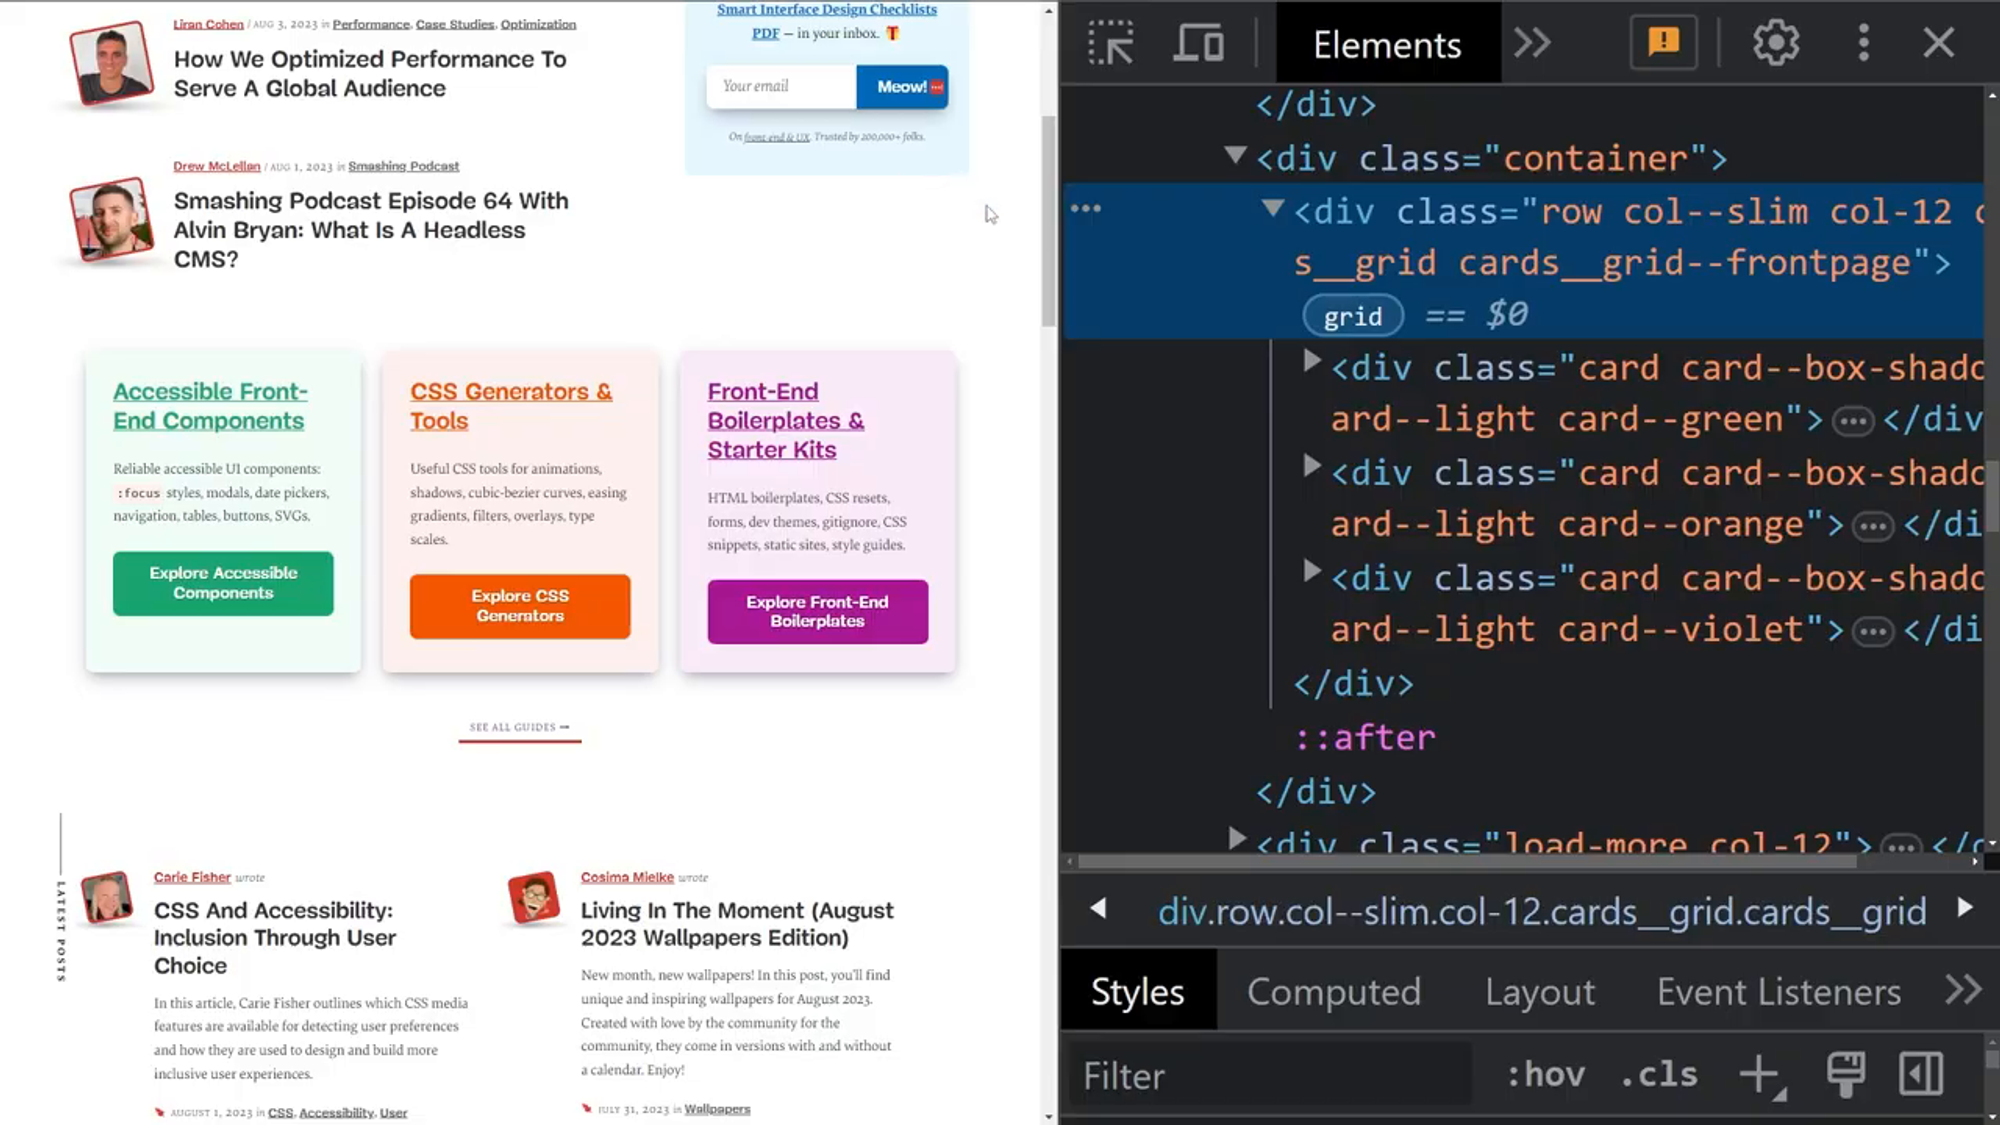
In general, you should use a semantic element, if one is appropriate, and use a <div> when you just need a box around some elements to help with your layouts.
Cheat sheet
If you ever need a quick rehash of all the tags mentioned here, you can refer to this handy cheat sheet I’ve put together.
And if ever you feel overwhelmed, you are going to be writing all of these on such a regular basis, it all sinks in quite quickly. It might not feel like it at first, but keep practicing for about a week, and you’ll be amazed at your progress!